TAMING THE STALL
We've gone on a bit about what a stall is, and some techniques to prevent stalling our planes when we don't want to. Now we'll look at how we can tame a planes stall characteristics somewhat.
But first, we need to look at how different wings stall. In general, as angle of attack (AOA) is increased, a straight wing, like on most trainers, will first start to stall inboard, at the wing root near the fuselage. And that's good. Although there is a loss of lift, all the messed up airflow is near the root, and the tips are still flying, meaning we also have aileron control out there where it's most effective. So we get a nose drop, but the plane stays reasonably level and we don't lose control.
But tapered wings are more efficient, and we'll see them on most higher performance planes. And the more highly tapered the wings are, the more likely they will stall first out at the wing TIPS. Stalls on such planes are very different; when a wing stalls first at the tips, a wing drops, you have no aileron control, and a simple stall instantly becomes a snap roll. Your first indication of a stall is when the plane flips onto its back, out of control!
Summarizing, we can see that if the stall begins out at the wingtips, we'll see a wing drop (often violently). But if the stall begins at the wing root, all we get is a nose drop, with the plane still under some control. What we'd prefer should be pretty obvious!
So what's the answer? How do we make a plane do its stalling properly, in at the wingroot?
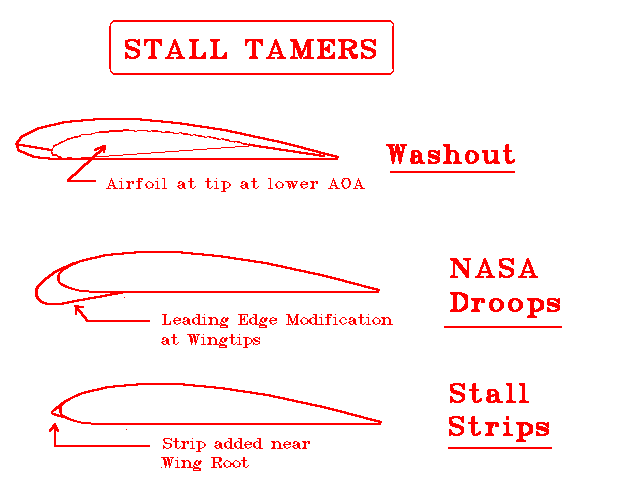
Washout is one answer. This is best done during the building stage, and involves "twisting" each wing during construction so that the tips "fly" at a slightly lower angle of attack than at the root, near the fuselage. Normally only a matter of about 2 degrees difference, (see fig.) the lower AOA at the tips mean that the root will always stall first. Many kits, even for straight winged planes, include washout in construction - as the wing is laid out on the building board, the trailing edge is set up higher out near the tip of the wing, giving you washout when the wing is complete.
Another way to accomplish the same thing is to use a different airfoil out near the wingtips; one that naturally stalls at a higher angle of attack than the airfoil at the root. This is very easily accomplished when cutting a foam wing, but is seldom seen in built-up construction. "NASA droops" will do this also, and could be added to an existing wing. The NASA droop is a leading edge "anti-stall" modification, usually applied to the outer 35-40% of a wing. (see fig.)

The easiest method to modify an existing plane to cure nasty stalling habits is the use of stall strips. Applied to the inner 20-25% of the wing, the stall strip is a small change to the leading edge that produces turbulence to that part of the wing at higher angles of attack, causing the stall to begin at the root. (see fig) Thus we will have a slightly higher stall speed, but the stall will at least be manageable. Plus - the beauty of the stall strips is that you can just pin them on and experiment till you get the effect you want, then make them permanent!
So if you have a vicious stalling plane on your hands, don't just try to cope till you crash it - add some droops or stall strips - let the plane age gracefully, THEN crash it!
Site maintained by QSoftWorks
Last Update: 10/12/97